Solus Linux (and Windows) on Dell XPS 13 – 9360 Kaby Lake

Time to put Linux on my XPS 13.

Pick a distro, any distro.

Historically I’m an Arch Linux user and what is not to like about a rolling distribution with good software availability.   No reinstall’s every few months. I’ve tried Fedora 24 Live on this machine and it worked just fine but didn’t have some software I want/need.  I’m not a fan of Ubuntu or re-spins of Ubuntu.

I decided to give Solus gnome a go.  I like the fact that its also a rolling distro with a reasonably up to date kernel based on the latest LTS kernel.  I’ve heard good things about its updates and dual boot support on UEFI hardware.  As far as the software I need, well that’s an unknown as I start installing.

Windows Technical Debt

My existing Windows 10 install was not shrinkable despite only 100 of the available 512 Gigabytes of the disk being used.  I was looking at either deletion of the recovery partitions and trying to squeeze Solus into that space or a full re-install.

First I went into the UEFI with F2 and disabled secure boot.  Then changed the disk controller mode from RAID to AHCI.  This makes the existing windows install unusable as the factory enabled Bit-Locker encryption freaks out from the lack of secure boot.  Instructions to decrypt the drive are all you will see when you boot.  As I’ve already given up on this Windows install I decided to just wipe the drive.

Install Windows

We will install Windows 10 first, but we will boot the Solus installer first.  When the Solus Live environment was running I opened GParted and deleted all the existing partitions on the XPS 13’s internal NVMe drive.  Next boot windows and create one partition (I went with 200 Gigs) This will actually create a few partitions within that space.  Continue the Windows 10 install until finished.

Install Solus

Boot the Solus install media and again open GParted, create your swap partition (I have 16 Gigs of ram and made swap the same size).  Your root partition (around 200 Gig) and most importantly a 512MB partition as per the instructions here.

Booting each OS

My system was set to default boot windows in the UEFI.  Pressing F12 will present you with a boot menu where you can pick which loader to use.  I went into F2 and put Linux Loader as the default.  The boot menu provided by Solus didn’t add the option to boot Windows.  I’ll add that manually later, but for now I just have to press F12 any time I want to boot into Windows.

Software

This was the bit I was most worried about, but turned out to be easy.  Open gnome software center.  Install almost everything I want (Atom, Vivaldi, Docker, Kitematic, htop) go into the 3rd party section and install Android Studio. That’s it.  On Ubuntu I’d have to add PPA’s.  On Arch some of these are in pacman, some in AUR and some would have to come as snaps.  So I have everything I need, with minimal fuss and in future I don’t need to ask myself which tool I used to install this app.  Its all there in software center!

Testing

Wifi works great with the built in Killer Nic 1535.  Suspend/Hibernate worked first time with no issues.  HiDPI looks great in Gnome.  Tap to click is enabled by default and also works on the login screen (always a problem for me on Arch and Fedora).  Sound works good, battery life seems decent but requires more testing.   Bluetooth paired easily with my Mad Catz RATM wireless mouse. Touch screen works just like it should.

Conclusion

Very impressive distro so far, I still need to tweak the boot menu but that’s about it everything else has been pretty much perfect so far.  The mouse cursor is too small on the login screen with HiDPI but generally I just hit enter and type my password.  Android Studio virtual devices don’t start and need to be launched from the command line, but I’ve had that problem on every distro.  It’s an Android Studio problem.

I would highly recommend Solus as a distro for the XPS 13 9360 Kaby Lake. Easy install, works, performs and minimal fuss.

Arch Linux – dual boot install via VirtualBox

So I’ve replaced all the hard drives in my desktop.  I have 8x SATA ports and 4x SSD drives.  Only 4 of the ports are 6 Gb/s on this board so the plan is this

Intel (6 ports, 2x 6 Gb/s, 4x 3Gb/s, AHCI or RAID 0, 1, 10 support)

  • 6 Gb/s ports 1 and 2 in Raid 0 with 2x Silicon Power S55 drives – Win 10
  • 3 Gb/s ports, 3 and 4 for 1TB SATA 7.2K drives, port 6 for SATA DVD-RW

Marvel (2x 6 Gb/s ports, AHCI support)

  • 6 Gb/s ports 1 and 2 with 2x Silicon Power S55 drive – Arch linux using LVM for Raid 0

I decided I wanted to do the Arch install through VirtualBox after my recent experiment using VMware to make a boot USB install.  The reasons are pretty much the same so go read that one if your wondering why….

Task 1 – Get VirtualBox to talk to the hard disks directly

I mostly use VMware Workstation, so this one surprised me, in the GUI of VirtualBox at the time of writing this blog, there is no way to directly map a hard disk.  So after a bit of googling I found this blog.  There you will find out how to make a .vmdk that maps directly to a physical disk.   In my case I made 2 vmdk’s.  Next you’ll need to start VirtualBox as an administrator so it has rights to use those disks.  Create a VM that has the Arch install .ISO in the virtual CD drive, add the 2 disks you created.  I also set the machine to emulate a UEFI system and not a BIOS, then start the VM.


Task 2 – Install:

So we are good to get started.  As you can see in the background I’ve written out my partition scheme as its a bit complex and I have the Arch Install docs open in case we need to check anything along the way.

01 - partition 1n2

This is gdisk listing the 2 drives.  I’m formatting the disks as GPT disks (not MBR).  I can show you my partition layout as its seen in Windows 10 just by refreshing windows disk manager.  This is after writing /dev/sda and before I repeated the steps on /dev/sdb, 1G for boot, 18G for swap on each disk and 92.79GB for LVM.

03 - windows confirmation

Then comes formatting of the partitions.  As this is a UEFI system our boot partition (and boot.bkp on the other disk) need to be FAT32.  I assign sda3 and sdb3 as “physical volumes” so that I can create a volume group on them.

04 - filesystems

Creating the “Volume Group”, and then finally the “Logical Volume” as a striped disk.  What I like about this approach is the volume group has 2 disks, but I can create another partition as a mirror, so if I want to have my home directory on a mirror I can still use the same volume group.  With that in mind I’ve left some space for later.  The data alignment is supposed to help with SSD rewrite scenarios.

05 - lvm

I’m formatting the logical volume with xfs.  Its the fastest option for the workload I’m going to put on it, also it supports discard/fstrim which is important in an SSD system.

06 - root-xfs

Now we mount the disks so that we can continue the install.

07 - mounts

Install packages through pacstrap

Problem Time:

So on the face of it this worked, but it doesn’t.  Essentially its added a UEFI boot entry to the UEFI bios of the Virtual Machine and not the actual hardware we are running on.  So later we are going to have boot the USB key, mount the boot partition and run “bootctl install” again to actually add an entry to the physical hardware’s boot menu.

Carry on Regardless:

We have to edit mkinitcpio.conf, we need sd-lvm2 support in our ramdisk to start the raid that the root partition lives on.  xfs is not needed its covered by filesystems, I just did that out of habbit 🙂

I also installed  intel-ucode and some other things I’ll want later

Adding the boot entry so that the microcode update runs.  Instead of using PARTUUID we use UUID as we don’t have a single partitions UUID we can put here, instead we put the UUID of the LVM logical volume as it will be when the LVM module loads.

Before the final reboot I enabled NetworkManager and FirewallD, then reboot and test the machine boots in VirtualBox (it does).

Finalize the Install:

With that the install is done, depending on your UEFI firmware it may be bootable, mine was not yet, so I booted an arch key, mounted the root and boot partitions, then rant bootctl install again.  After this the machine would boot to windows or Linux and I could pick whichever option I preferred from the bios menu (F8 on my machine)

It should be possible while in windows to start up the VM and access your Arch Linux install.  If you have samba or FTP running in Arch you then have a nice way to share files between Windows and Linux, enjoy!

Installing Arch Linux on a USB Key for UEFI systems

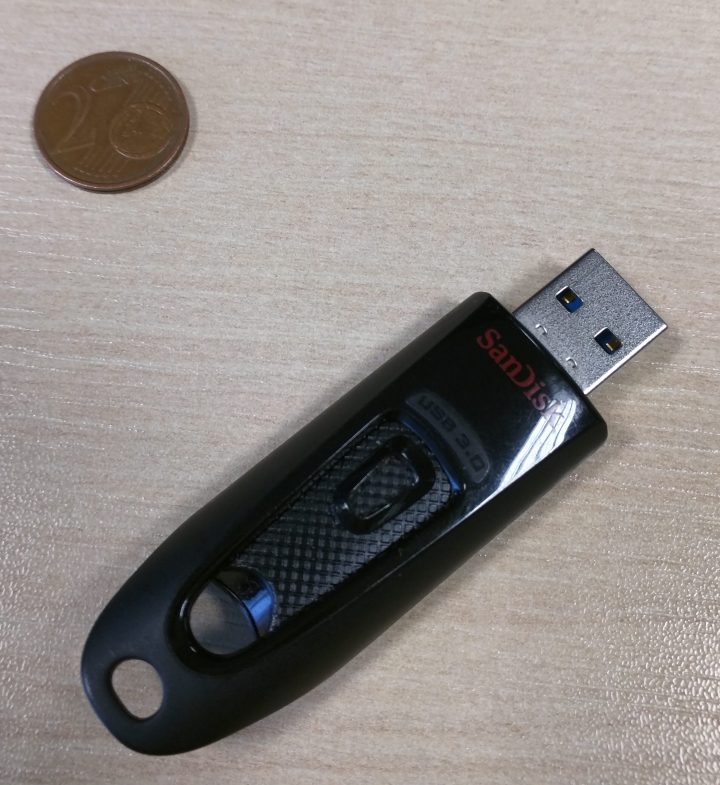
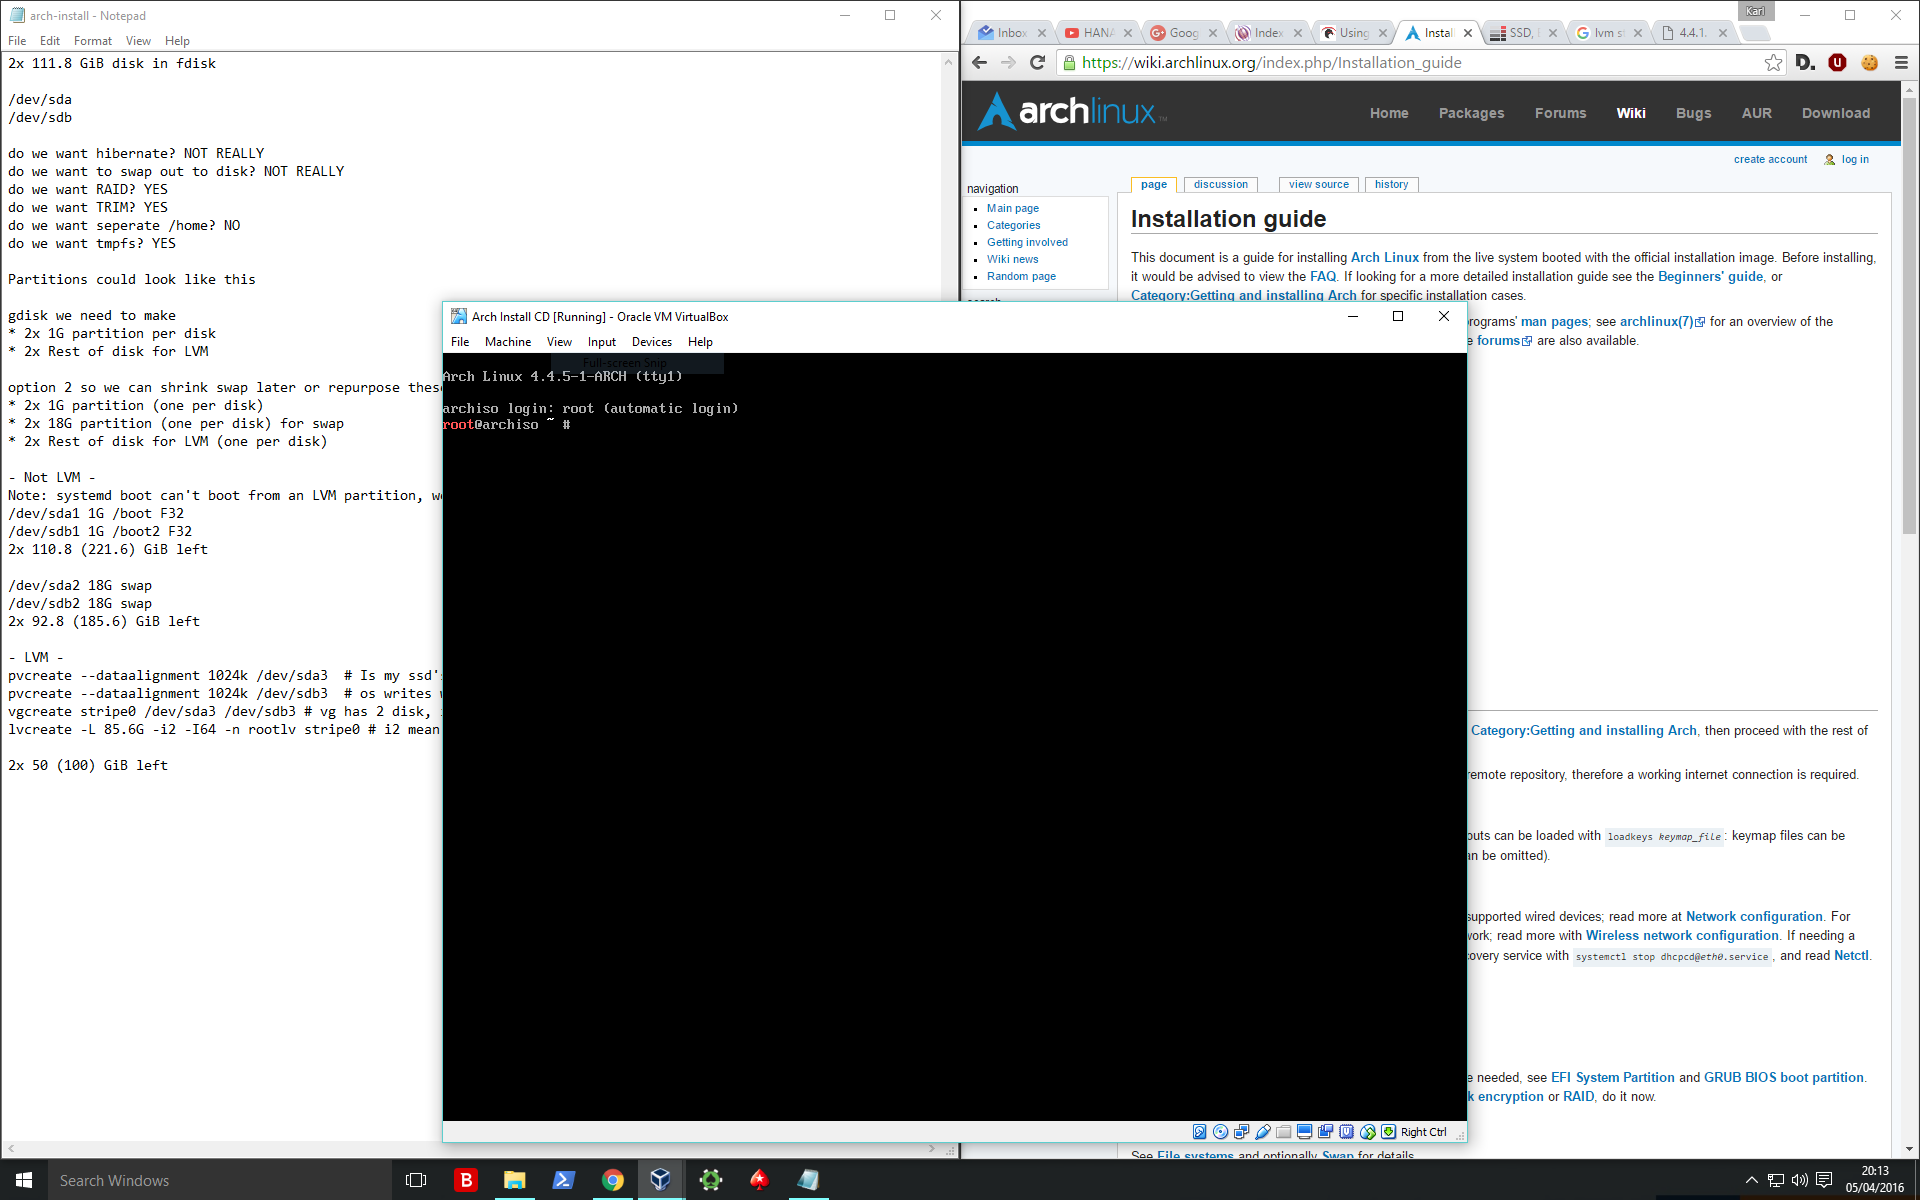
Task:

Install Arch on a UEFI bootable USB drive or SD card so that it can be used on machines that have we don’t have the luxury of changing the local disk partition structure (corporate IT policy, low space, etc.)

Hardware:

So I have this 32GB USB 3.0 Key that I’m going to use, it seems to perform well enough to be usable without being frustrating.  Sure is ugly though!  I’ve ordered a nice fast SD card that will take over when it arrives.  If your UEFI firmware can read the SD card it will boot from it using the same methods.


I’m going to use a virtual machine for the install, you could do it on the real hardware or use Virtualbox or similar.  You don’t need it, but it does mean you don’t have to present the core OS drive to the VM so you can’t accidentally delete your Windows install.  Also you can use the host PC fully while you go through the installation process.  Finally it saves you messing about with WiFi, you can do that later which is handy, especially if you need to install a package or files before you can get WiFi working, so for me its a big benefit!

I’m using VMware Workstation 10.x.  The VM is setup is simple, some memory, some CPU’s, a local disk that we won’t use, our Arch Linux .iso is attached to the virtual CD/DVD drive, we use NAT so that our VM has network access and that about it.

After booting the .iso I’ll insert the USB Key and pass it through to the VM then, check dmesg to see what it is called.  So for this install its going to be /dev/sdb that we are working with.  If i run ‘fdisk -l’ the only disks I see are the 512MB virtual disk and the 32GB USB key, so my Windows SSD is nice and safe.  This VM can’t delete what it doesn’t know about.

Install – Disk Partitions:

First we will change the keyboard, then partition the disk as a GPT disk with a UEFI boot partition (FAT 32)

  • # loadkeys /usr/share/kbd/keymaps/i386/qwerty/uk.map.gz
  • # gdisk /dev/sdb

In gdisk I issued command o, which creates a new GPT partition table, the I created the following partitions.

  • sdb1 512M EF00 for /boot
  • sdb2 1024M 8200 for swap
  • sdb3 (all remaining space) 8300 for /

Then we create some partitions, the boot partition absolutely must be fat32 as that is what the UEFI firmware will expect to see.

  • For /boot
    • mkfs.fat -F32 /dev/sdb1
  • For swap
    • mkswap /dev/sdb2
    • (optional: if you want to use during the install) swapon /dev/sdb2
  • for /
    • mkfs.ext4 /dev/sdb3

Install – Mount and Select a Mirror: 

After mounting the partitions and selecting a mirror start the file downloads.

# pacstrap -i /mnt base base-devel

On my laptop this amounted to 222.3 Mb of download which is good as I’m using my smartphone as a WiFi hot spot for this install.  One package did fail on me for too slow data transfer so I added another mirror, that didn’t work either, so I replaced the mirrorlist file with mirrorlist.old, then after i got the file I put it back to just heanet which is my local mirror.

Make an fstab with UUID’s as we don’t know if this key is always going to be sda or sdb at least we should be able to find our paritions by UUID regardless of the system.

  • #genfstab -U -p /mnt >> /mnt/etc/fstab
  • # arch-chroot /mnt
  • # nano /etc/locale.gen
  • # locale-gen
  • # echo LANG=en_US.UTF-8 > /etc/locale.conf
  • # export LANG
  • # ln -s /usr/share/zoneinfo/Europe/Dublin > /etc/localtime
  • # echo sanlinux > /etc/hostname
  • # passwd
  • # useradd -m -G wheel,power -s /bin/bash karl
  • # passwd karl

Now we are ready to setup the boot loader, as I’m running in a VM that does not emulate UEFI it tells me “Not booted with EFI, skipping EFI variable setup” but that appears to affect nothing.

  • # bootctl install
  • # blkid -s PARTUUID -o value /dev/sdb3 >> /boot/loader/entries/arch.conf

Then use nano to edit the file so that it looks like this

  • title Arch Linux
  • linux /vmlinuz-linux
  • initrd /intel-ucode.img
  • initrd /initramfs-linux.img
  • options root=PARTUUID=the-id-that-was-in-the-file rw

Install some additional requirements, intel-ucode is for CPU microcode updates, networkmanager is my preferred way of networking, firewalld is a handy front end for iptables and bash completion is very helpful everywhere but especially with firewall-cmd.  mesa for opengl,

  • # pacman -S intel-ucode
  • # pacman -S networkmanager
  • # pacman -S firewalld
  • # pacman -S bash-completion mesa

So now the moment of truth, I rebooted windows, hit F12 a bunch of times to get a boot menu, picked the USB key and 10 seconds later I had this

Great, so I’ve one remaining issue, my WiFi card needs firmware, so I downloaded it to an SD mounted it and copied it to the right folder, job done.   Expect more arch Linux posts in the future.  Now because its Arch I need to go off and install my favorite window manager and apps.  I can’t wait for that SD card to show up so that I’ll have 64 GB to play with at reasonable speeds and no ugly USB Key!


Moving from Arch Linux to FreeBSD..

..and from a local web-server to a cloud based virtual machine.

So I’ve been running this site on an old Dell D400 laptop for a while.  Arch Linux has been the operating system of choice.  This machine has performed admirably as a web server for many months now.  But its single core 1.6 Ghz processor and 5400 RPM hard disk are limiting factors for performance and expansion.  Lets migrate it to the Cloud…

First step was to select a place to host the site from.

I went with a Digital Ocean droplet, I was able to quickly sign up for a single core machine with 512Mb of RAM and 20 Gigs of SSD storage  for $5 per month ($6 with weekly backups).  The lower amount of memory was not such an issue as Arch was using maximum of around 400Mb and that is running more services that just the website.  I could pick a data-center in London and speeds to and from droplet are clearly faster than my broadband’s 240 down and 24 up.

Operating System:

I’m a big fan of Arch Linux, but at this time Digital Ocean don’t offer it and to be honest I’d never expect them too.  CentOS is a solid choice and familiar to an R.H.C.E. like me, Ubuntu is also available but while I’ve used it a lot I just don’t enjoy some of the problems that crop up and how you need to solve them.  So in the end I decided to go with FreeBSD.  The choice came down to this, I can work with that operating system faster and the base install seems to be more memory efficient which should not be a factor, but its always better to have more RAM than you think you’ll need.

Deployment:

So the droplet was created very quickly, I had to generate an ssh key and associate it with the droplet first.  Then I still had some trouble logging in.  This came down to the fact that its not very clear that you need to use that key to login as the user FreeBSD then use ‘su’ and ‘sudo’ as needed, I eventually found out through Digital Oceans blog, would be nice if it said so on the creation screens.  Once that was out of the way we quickly install our web-server/database/language stack setup each component and wrote some test pages to make everything worked.

Finally I moved across this WordPress blog in about 2 minutes, using tar, gzip and ftp and it worked pretty much straight away.  Its so nice when your planned migration even a small one like this actually goes like clockwork!

Next:

So I will be blogging more instead of maintaining the servers, next I want to see what the state of MongoDB is on FreeBSD I’ve a feeling it isn’t going to be pretty, but time will tell.

Arch Linux: moving from php5 to php7

So as per usual I issued a pacman -Syu, then did a reboot to check everything is as it should be and well it wasn’t.   Apache was no longer starting as it was claiming that line 155 in the config file was wrong.

155 LoadModule php5_module modules/libphp5.so

I remember reading that arch had moved from php5 to php7 so this made sense.  I changed the line to the following

155 LoadModule php7_module modules/libphp7.so

That worked out as expected, the server was happy to boot up now, however on my homepage I got a warning that mysql support is not enabled in php.  So next we changed /etc/php/php.ini to removed the semicolon infront of

877 extension=mysqli.so

Restart apache, job done..

Arch Linux: Rolling distro fun

Arch Linux is great, change is great, except when you don’t know what has changed and why.

Case in point, my home server is up 100+ days, I update and reboot.  My web access is gone and SSH doesn’t work either.  When I regained physical access, I see both services are failed as they could not bind to the network card, that’s funny because samba, ftp and NFS all managed fine.  Why?

As I’m running systemd I was able to figure out the following with a few ‘systemctl status something.service’ commands.  sshd and apache come up before the network card, they retry but fail.  5 seconds later the network is up, so when I restart the services manually all works as expected.

Fixing it was a bit more messy.  Both systemd scripts are small and simple both specify ‘After=network.target’ that target doesn’t give away much.  I’m using NetworkManager so I changed both to ‘After=NetworkManager.service’.

Result, the services http/SSH start later but still too soon.  Appears NetworkManager has started but not completed its job yet.

Try again:

‘After=NetworkManager-wait-online.service’

This “service” starts when network manager completes its startup, so telling SSH and http that they start after this will ensure the network is up.

Fixed! until the next update 🙂

ddclient

So ddclient can be confusing if you never used it before. I’m still figuring it out.  Seemed pretty easy at first, create your ddclient.conf file, run ddclient in a shell and you get no output.  It appears to do what it should which is update your dyndns address to point to the current IP address your machine is using for internet access.  However it actually demonizes itself, which is not good if you don’t know about it.

So I setup a cron job to run ddclient every few minutes, because when my dynamic IP changes, I only want to have a few minutes downtime before the DNS record is updated.   My cron job worked initially, but it caused ddclient to spawn a new process that also became a daemon each and every time.  So initial testing was fine, but after a while I had 1000’s of ddclients running.  All the memory got consumed and mariadb was killed to save memory, and well that was that 🙂

Currently testing some other things like, using a dyndns key instead of a password, which confusingly you would put in the /etc/ddclient/ddclient.conf file under the heading “password=SOMERANDOMKEYTHATISNOTAPASSWORD”.  Logically you would think you delete the “password=” field and replace it with a “key=” field.  But maybe its too much to expect a config file to  be descriptive of the thing its configuring.

Its still a very useful piece of software if your hosting content on a home server!